12.30.2012

punch party


With New Year's Eve right around the corner, it seems like the perfect time to whip up a batch of punch. I love serving punch at parties. It's a great way to serve a fun cocktail without having to play bartender all night. To really up the cute factor, try searching your local thrift store (or grandma's cabinets) for a vintage punch bowl. I recently scored one- with 12 matching cups- for only $10! 

If you really want to take your punch to the next level, try making your own decorative ice block. Not only will it look fancy, the block will melt more slowly than ice cubes and keep your punch from getting watery. Making an ice block is super easy. The hardest part is remembering to make it the day before your party, so it has time to freeze overnight.

Click below for the how-to:

12.10.2012

chickens: a retrospective


I've been missing our chickens lately, so I thought I'd share a few videos I found from the first year we had them. This photo is of Dorothy the first day we got her. Being a two-day-old chick is so exhausting, you often fall asleep in your food dish while eating.


This first video was taken in March 2011, when the chicks were about two weeks old. This was their first trip outside and their minds were blown!


This video was taken the very next day. It didn't take them long to feel more comfortable testing out their new wings outside.


Just two short months later in May 2011- the ladies have entered their awkward teenage phase...


And then by January 2012, they were full grown chickens fighting over a dish of oatmeal and flinging it all over each other.


Sadly, we had to find a new home for the chickens when we moved, but I'm looking forward to the day when we have a big enough yard to get more baby chicks! Only next time we'll know better and won't try to raise them in our living room.


12.02.2012

muji muji muji


The new MUJI store opened in San Francisco this weekend and I went to check it out!


The store is 7,250 sq feet spread out over two levels. It seems larger than the MUJIs I've been to in New York (though I'm told its small compared to their stores in Asia).  The first floor is mostly clothing and stationery, and the second floor is furniture and housewares. 

As soon as I walked up the stairs to the second floor, I immediately took back anything bad I've ever said about minimalism. As much as I usually gravitate towards bright colors and patterns, there's nothing like a MUJI store to make me want to organize all my possessions in matching white boxes and swear to live a life of Japanese simplicity. 


It's hard to argue with their philosophy of "no-brand quality goods".  I find it so refreshing to visit a store where everything is not covered in logos. They focus on design and quality, streamlining their products to just the essential components. Where else can you buy a blank notebook that actually has a blank cover, with no writing at all? 

Plus, what they lack in branding they more than make up for in merchandising...


What is it about a well-stocked display that makes me swoon? 

Somebody better hide my credit card. 


[all photos except MUJI sign courtesy of Michael Pieracci]

11.14.2012

corner book nook


Once I set up the frame cluster and mini bar on one side of our living room, the wall opposite was looking a little blah. The TV sort of dominates that corner, so I needed to find a way to distract from it. Ideally, I would have filled the corner with a set of bookcases or floor-to-ceiling shelves. Unfortunately, we're renting and have no idea how long we'll end up staying here, so I wasn't looking to make a big investment in custom shelving. So here we have the quick and cheap solution!

Here's the before photo:


I looked around a bit for shelves that would fit in the corner, but of course ended up at everyone's favorite source for cheap solutions: IKEA! They didn't have shelves that were the right size, but I did score these brackets for only $3 each! 

Next stop was the hardware store, where I was able to have them cut a 10' pine board into two shelves that fit the exact dimensions of the corner. Technically they're only supposed to make one cut per board, but usually if you do the measuring yourself and mark it for them (and ask nicely and maybe bat your eyelashes a little) they'll do an extra cut or two. Buying one long board and having them cut it is always less expensive than buying multiple small pieces of wood. The board was only about $12, which was even less than the fake wood shelves at IKEA.


Once I brought everything home, I realized I forgot to buy sandpaper again, but I decided to just paint anyway (why am I so bad about sanding??). The cut ends of the wood were a little rough, but it wasn't too noticeable after a couple coats of paint. I let everything dry overnight and then it was time to put them up!


And presto! Quick and easy corner shelves for under $25! I think the most difficult part of the project was deciding which books and "flub dubs" (a term my husband has taken to using, after he learned Abraham Lincoln used it to describe his wife's knickknacks) should go on the shelves.

11.04.2012

Can I interest you in something from the mini-bar?


Our new apartment is somewhat lacking in cabinet space, so I decided to set up a little bar in the living room to store our booze and drinking accoutrements (at least until I can score the bar cart of my dreams). I thought this would be a great excuse to go shopping for a fabulous tray to contain everything. Unfortunately, most of the trays I found were surprisingly expensive for just a simple rectangle of wood. 

Then I remembered I still had this kinda ugly tray stored with my BBQ supplies:


I nabbed this from my mom's pile of give-aways when she moved a few years ago. I was never crazy about the cherry motif, but the tray was a good size and shape. Time for a makeover!

If you want to try your own version of this project, you can usually find trays like this in thrift stores for next to nothing, or Target has a plain wood one for pretty cheap here.

See the how-to after the jump:

10.23.2012

Movin' on up?


My Dear Readers,

I would like to apologize for leaving you hanging for so long. I’m sure many of you have been laying awake late at night asking yourself, “Why aren’t there any new kinda pretty great posts?? Where has she gone? How could she do this to us?!?”

Well, the short answer is: I moved.

We only moved across town, but it felt like much farther. After our previous landlord went bankrupt, we had to move out of our ground floor apartment in a big beautiful old house with an enormous yard. Thanks to the insane rental market right now, the only place we could find was a smaller (and more expensive!) unit in a duplex with a small chunk of dead grass for a front yard.

The previous tenants were a bunch of dirty hippies (I’m using that term very literally here), so we’ve had our work cut out for us:


(If only they’d left us that chair that looks like a hand!)

Scrubbing everything down to remove the funk has taken some time (and a lot of trips to Target), but the new place is slowly starting to come together with each box I unpack.

The most tragic part of the move was having to say goodbye to our chickens. Our new apartment allows dogs, but there was no room for six hens. We found them a great new home with a very excited old lady, but it made for an extra sad moving day.


Stay tuned for more photos and projects as I work to turn this hippie cesspool into a home!

8.27.2012

world's tiniest flower arrangement


My husband was sweet enough to bring me flowers the other day. They were Celosia to be exact:


(side note: I finally figured out the name of these flowers by searching for “velvet brain flowers”. I love the internet.)

In the process of putting these flowers in a vase, I had to snip off a bunch of little flowery sprouts from the lower ends of the stems. I know this is pretty standard when arranging flowers, and I think most people just toss them. It sort of breaks my heart to throw away flowers though, even if they’re tiny. So I pulled this little elephant-shaped milk pitcher out of the cupboard and made a teeny tiny arrangement.


I think it’s pretty cute for a little bunch of trash!

8.13.2012

pinata numbers


I recently came upon some photos of the decorations from our New Years party last year, and was thinking about how they could be re-worked for a birthday party. I've had birthday ideas on the brain lately (mine is coming up soon, and its a big one!). 

For New Years, my friend Nicole and I constructed a 2011 pinata to be destroyed at midnight. We made each of the numbers separate (only the last 1 was stuffed with anything). When the magic hour was approaching, we hung up the 1 and then took turns beating the crap out of it at the stroke of midnight. The showering of confetti and candy that rained down was a great way to ring in the new year. We then ceremoniously replaced the 1 with a 2 to make the pinata read 2012.


I think this could also be a great way to mark a birthday. Nothing says "I'm done being 29" like beating a pinata in the shape of 29! It might just be the perfect way to begin what I'm sure will be my mature, grown-up thirties!

P.S. You may be wondering "why are there star trek figurines in these photos?". Unfortunately, I have no answers for you. Except to say my friend Michael loves Star Trek. And he may have started sampling the signature cocktails during party setup. And yes, that is Whoppi in the blue suit.

[photos by Michael Pieracci]

7.30.2012

brown paper packages tied up with string


I love sending and receiving packages in the mail, but going to the post office can be a real drag. As if the endless lines and grumpy people weren't bad enough, the postage stickers they use (with the price printed in huge numbers) always seemed so tacky to me.

If there's one thing the post office does do right, its stamps. It seems like they're always coming out with pretty new designs. I like to stock up on the especially great ones when I see them. With a supply of cute stamps at the ready, I can often avoid a trip to the post office when mailing a small package.


The USPS has a postage calculator on their website, which you can use to estimate the postage rate. As long as its a relatively light package, using stamps for the postage is an easy (and much more cute) way to mail it.

If you don't happen to have a postage scale at your disposal, a kitchen scale is a great alternative. In a pinch, I sometimes just estimate a package's weight by comparing it to things around my house.

Does the package weigh more or less than a 15 oz can of beans?

More or less than a Dexter?

I usually add a few extra stamps just to make sure I cover the cost (an extra 50 cents seems like a small price to pay to avoid post office lines).

If the package is under 13oz, you can just pop it in a mailbox. If it weighs more than that, you'll have to drop it off at the post office (though you will get the smug satisfaction of waltzing past the line to drop if off at the counter).

7.21.2012

minimalism is a bummer


I've long been a fan of Jonathan Adler's whimsical pottery (his Candid Canisters crack me up!). His genius manifesto makes me like him even more.

7.16.2012

whoa there hoarder...


Despite the belief these days that everything is online, I still find myself looking at a fair amount of print material. As much as I love Pinterest, I'm an old fashioned girl that loves paper, and I'm not about to start scanning things to put them online. I still subscribe to magazines, and I can't seem to stop a handful of catalogs from arriving in my mailbox every month. Some issues are easy enough to throw in the recycling bin after leafing through them, but the ones I like I tend to hoard. When those combine with the postcards, programs, greeting cards, and other random bits of paper I save, the situation can get dangerous. 

We've been doing some spring (or I guess now its summer) cleaning lately, and my husband suggested that maybe I should do something about the towering stack of magazines next to my bedside table that had been threatening to bury me alive. Of course, I tried to explain to him that I needed to keep all of them, but he just gave me a look that said "I'm going to turn you in to Hoarders".

Luckily, I had also just found my old image file from my fashion school days. One of my teachers had suggested we use an accordion file to create a filing system for all the magazine tear sheets we were collecting. When filed by category, the magazine tears are more accessible and therefore more useful as inspiration. Instead of trying to remember which issue had that beautiful floral arrangement, I can just look under my "florals" tab and find a whole stack of flower photos I liked. 


The accordian file I had was already pretty full, so I started a new one with categories that are more relevant to my interests now. Coming up with the categories is probably the most fun part of this project. The categories only need to make sense to you, so you can make them as random as you want. Like squirrels? Make a "Woodland Creatures" tab. Love the color blue? Start saving snippets under a "Blue" tab and you will always have a swatch to explain exactly the shade you are looking for.  Its great to make files for things like planning a wedding, or aspirational photos for your dream home. Then when the time comes to actually pick out invitations, or paint your kitchen, you're not starting from square one. 

The sorting process took some time (because of course I had to go back and reread the interesting articles and lustfully gaze at the Anthropologie catalogs again), but it was fun to do in an OCD kinda way. And now that my system is in place, it will be much easier to keep the magazine stack in check. Whenever I finish with a magazine or catalog, I cut out the articles/photos I like and file them under the appropriate category. Then the rest of the issue can take a trip to the recycling bin. Its amazing how much less space this takes up. Even with all the random paper I've saved over the years, I still only have two accordion files in the corner of my bookshelf.
Now if I can only figure out what to do with all those half-read issues of the New Yorker that I haven't been able to part with...

7.09.2012

dip dyed cake


Doesn't this dreamy cake make you want a Creamsicle?
I've been wanting to try David Lebovitz's recipe for orange ice cream inspired by the classic popsicle. 
Find the recipe online here.
[cake photo taken by Michael Pieracci and styled by me. cake by Oakland Bakes.  popsicle photo by pastry break]

7.05.2012

beehive envy


I kinda always wanted hair like Patsy from Ab Fab. 
She always seemed to be pulling a bottle of vodka or a cigarette out of it.
Who knows what else she had hidden up there...

6.21.2012

magical pink lake


Must get a pink boat to sail here, stat!

Situated north of the Cap Vert Peninsula in Senegal, northeast of Dakar, Lake Retba, is pinker than any milkshake you’ve ever come face to straw with.
Experts say the lake gives off its pink hue due to cyanobacteria, a harmless halophilic bacteria found in the water.
If the color weren’t enough to make you smile, it should be known that Lake Retba has a high salt content, much like that of the Dead Sea, allowing people to float effortlessly in the massive pink water. In fact, Lake Retba has an almost one and a half times higher salt content than the Dead Sea.

(via bangstyle)

6.14.2012

what's for dessert? a miracle!


Want to mix things up a bit the next time you serve dessert?
Pass out some Miracle Fruit first!
Miracle Fruit (Synsepalum dulcificum) is an awesome West African berry that temporarily modifies taste perception. Once it binds to your taste buds, you are only able to perceive sweet tastes. 

You can order it as tablets from Amazon: Miracle Frooties


The effects can last anywhere from 15 minutes to several hours, so I recommend preparing a selection of foods for your guests before taking the tablets. 

I recently had a Miracle Fruit party and we served an assortment of fruits, dark chocolate, baker's chocolate, black coffee and unsweetened 100% cranberry juice. 


It takes a few minutes for the tablet to dissolve on your tongue before the "miracle" takes effect. We were unsure how we would know when it had started working, so we began by drinking the unsweetened cranberry juice. With the first sip, there was no question it was miracle time. This juice is usually so sour it is almost undrinkable, but under the magic spell of miracle fruit, it tasted sweeter than Ocean Spray!

By far the most interesting things to taste are the foods that are usually the most sour. Lemons, limes, and grapefruits were incredible. Slightly sour early summer blackberries were transformed into the ripest, most delicious berries you've ever tasted. Some of the naturally sweet fruits like oranges were almost too sweet to eat. The chocolate and coffee were interesting, but everyone agreed they were not as delicious as the fruit. At my next miracle fruit party, I want to try goat cheese or some dark beer (apparently it tastes like a milkshake!). 

[Photos courtesy of Michael Pieracci]

6.06.2012

watercolor ombre


The watercolor effect on these vintage crepe paper balls is gorgeous! Why do I always find things on etsy after they've been sold?


[were available from ethanollie. via Frolic]

5.28.2012

a floral take on ombre


I don't know about you, but I can't seem to get enough of ombre everything these days. I recently helped my friends at Oakland Bakes develop this cake using flowers to create a romantic ombre effect. We used ranunculus and cyclamen in shades ranging from white to bright pink. 
This cake makes me want to get married all over again!

5.18.2012

top that cake


Need a special cake topper for your next celebration? My good friend Sarah is making these gorgeous gum paste letters.
She also does mini diplomas and numbers that are perfect for a graduation party!
Her glittery numbers are featured in the May issue of Martha Stewart Living.
[cake and cupcake photo from Signe Sugar, brownie photo from Martha Stewart]

5.12.2012

go for the gold!


Let's say you are hosting a competition (like maybe a burger cook-off?) and you need a trophy. Let's say you forgot about it until the day before. So now you need it on the quick and preferably on the cheap. "Impossible!" you might say.

Nonsense! Just make one out of crap around your house (or crap you find in the clearance section of Target).

Now before I get your hopes up too high, you may be wondering, "Will this look as official as the trophy I got in second grade for playing soccer? Will people believe I spent a lot of money on this solid gold trophy?". The answer is no.

But stop right there. When was the last time someone made you a trophy? The question you should be asking is, "will it make someone's day to receive a handmade trophy even if it is a little crappy?". 
Of course it will!


There are many things you can use to make a trophy. The most important elements are:
1. A sturdy base (I've found empty yogurt containers work great for this)
2. A fun shape for the top (In this tutorial I'm using magic wands I found in the kid's party section of Target. For past cooking competitions, I've also used cheap-o spatulas I found at the dollar store)
3. Gold spray paint. This is non-negotiable. A trophy isn't a trophy if it isn't gold. 

Click below to see how easy it is:


5.06.2012

mini flag garland


I've always loved Papel Picado (Mexican wedding flags), so I really flipped when I found a mini version while shopping in the Mission. These little flags were the perfect size for decorating a cake table, but I think they'd also be great in a window or on a mantel.
Now I want to hang them all over my house. 
Available in a whole rainbow of colors at Casa Bonampack
[cakes by Oakland Bakes]

5.01.2012

time for winning!


Why not introduce a little friendly competition at your next BBQ? 
Try hosting a cooking contest!

Simply send out an invitation challenging your friends to see who can make the "World's Best (insert kind of food here)". Its best to choose a food that allows for many variations. We've had hamburger and kebab challenges for BBQ parties. You can also do something like mac n' cheese when its too cold for grilling.


The advantages of this are threefold:

1. People will bring food to your BBQ. It will be actual food they put thought into, not just chips they picked up on the way.
2. You'll get to eat a lot of different delicious food with very little cooking on your part.
3. Everyone will be united around a central event. This is the easiest way to get people talking that don't know each other. Fun will ensue!

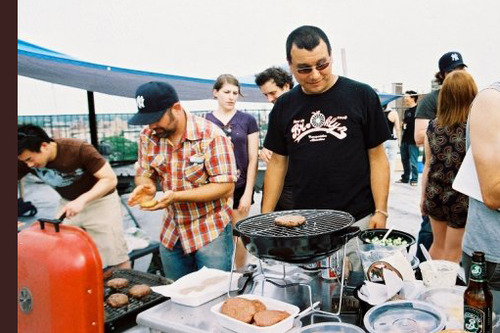
My favorite theme so far has been the burger cook-off. It allows for endless variations and everyone loves burgers. At our last competition, we had quite a variety: beef, turkey, lamb, chicken, mushroom, and lentil.

As the host, its a good idea to have basic condiments on hand, as well as some extra buns (inevitably someone will forget to bring buns for their burger. How does this happen? I don't know, but it does). You may want to also provide some side dishes, or you'll be likely to have burgers with a side of...burgers. 


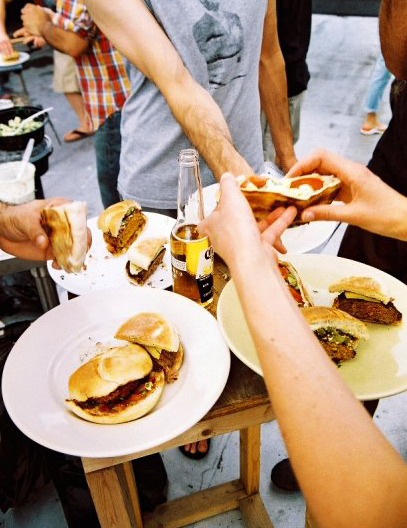
You'll also want to let people know how many burgers to bring to participate in the cook-off. We usually tell people to bring sliders, or plan to cut their burgers in four so everyone can try a piece.

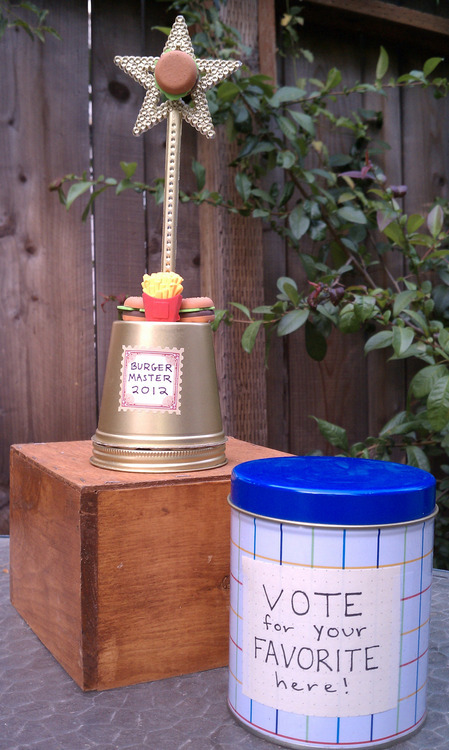
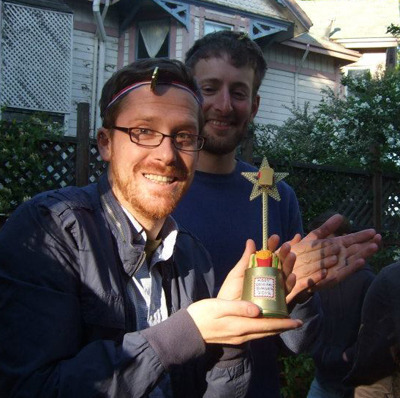
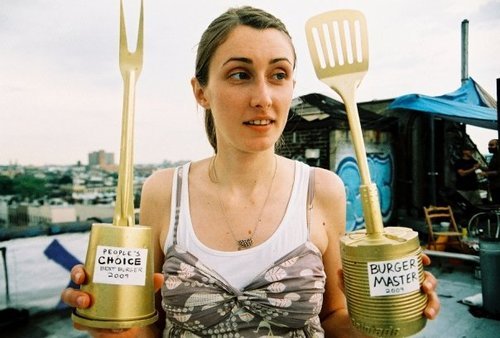
To decide on a winner, I like to have everyone vote via secret ballot. You may want to offer more than one prize. I usually like to offer one prize for "Best All Around" (otherwise known as the "Burger Master"), and then something like "Most Original". This gives the vegetarians a chance at winning something, and encourages creative entries. 

Now you may be wondering, "what could I possibly offer as a prize that would properly reflect the importance and grandeur of winning a competition such as this??". Well, for many people, a full belly and the admiration of their friends may be enough. But I prefer to mark the occasion with homemade trophies!

Stay tuned for the how-to... 

[Photos courtesy of Lauren Veloski]