
I've been working on organizing and decorating our office lately, particularly my desk area. I've been looking for ways to make my desk pretty and inspiring without spending much, so I turned to the craft supplies I already have on hand. I came up with this ribbon hanger as a fun way to put my ribbon collection on display. It's easy, cheap, and a great two-for-one: it livens up the wall with colorful ribbon, and makes it easier to access ribbon for gift wrapping and projects.

This hanger is not hard to make (you're basically just tying some twine to a stick), but I've outlined the steps below for you:
Here's what you'll need:
1. One 3/8" wooden dowel (can be found for less than a dollar at your local hardware store)
2. Saw
3. Sandpaper
4. Approx. 2 yds of twine, thin rope or ribbon
5. Small hook for hanging
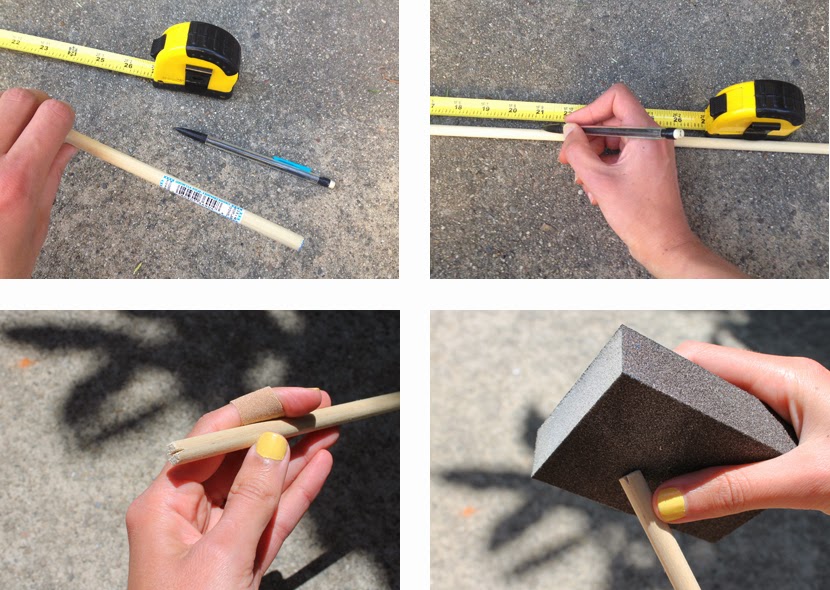
How-to (steps are shown left to right, top to bottom):
- The dowel I bought was 48" long, so it needed to be cut down quite a bit for this project.
- Using a measuring tape, measure and mark how long you want your dowel (I made mine 21" long). Use a saw to cut the dowel (or find a helpful dude at the hardware store to do it for you).
- Using a small hand saw, cut a small notch into each end of the dowel. I apologize that there's no photo of the cutting process, I may or may not have tried to use our serrated bread knife for this, and it's possible I cut myself in the process (note the band-aid on my finger). Be careful!
- Use sandpaper to sand down all the rough edges and make the ends look pretty.

- Admire your newly sanded dowel.
- Get yourself a long length of twine. Thread the twine into one of the notches in your dowel, at least 6-8" from the end of the twine. Pull the twine down so its securely wedged into the notch.
- Wrap the end of the twine several times around the dowel (as many times as you like, this is mostly decorative).
- Tie both ends of twine together in as fancy a knot as you can muster (I'm no boy scout, I just did a regular double knot, but you can make it more decorative if you like).

Once you have the twine tied to one end, it's time for the fun part: adding your ribbon! Add as many spools as you'd like, leaving at least 2" of room on either side of the dowel. Once you've got your ribbon on, it's time to figure out how long you'd like your twine to be. You could use geometry, or just lay it out of the floor to see what looks good to you. My twine is 42" from end to end, which gave me about an 18" drop from the hook to the dowel. Tie the twine to the second end of the dowel using the same method as the first, and you're ready to hang it up!

I used a small hook from the hardware store to hang mine. They just screw right into the wall, and are much more secure than a nail.
Now, let the ribbon dispensing begin!
No comments:
Post a Comment